Why Oreo Delight A Dreamy No-Bake Dessert Steals Hearts

If you’re craving a dessert that blends nostalgia, easy prep, and irresistible flavor, look no further than Oreo Delight A Dreamy No-Bake Dessert. This luscious treat combines the iconic crunch of Oreos with creamy, dreamy layers that come together without turning on the oven. Perfect for busy days or last-minute guests, this dessert delivers rich taste and a stunning presentation while keeping your kitchen cool and stress-free.
Why You’ll Love This Recipe
- Effortless Preparation: No baking required, making it ideal for quick and simple dessert fixes.
- Delicious Layers: Creamy fillings and crunchy Oreos create a perfect texture combination.
- Family Friendly: Loved by kids and adults alike for its familiar flavors and indulgence.
- Versatility: Easily adaptable with different flavors or added mix-ins to suit your taste.
- Impressive Presentation: Looks stunning on any dessert table, guaranteed to wow guests.
Ingredients You’ll Need
This recipe is all about simple but essential ingredients that balance rich creaminess with the classic Oreo crunch. Each element brings a unique texture or flavor that builds up the dreamy layers anyone will adore.
- Oreo Cookies: The base and star ingredient, adding signature chocolate crunch and flavor.
- Cream Cheese: Provides a smooth, tangy richness that binds the layers together perfectly.
- Whipped Topping: Adds lightness and airy texture that makes the dessert melt in your mouth.
- Sweetened Condensed Milk: Delivers sweetness and creamy consistency without extra fuss.
- Vanilla Extract: Enhances the dessert’s overall flavor with a warm, fragrant note.
Variations for Oreo Delight A Dreamy No-Bake Dessert
Customize this dreamy dessert easily by playing with flavors, dietary preferences, or fun add-ins. It’s a flexible base recipe that invites creativity without complexity.
- Chocolate Lover’s Twist: Add melted chocolate layers or cocoa powder for deeper chocolate intensity.
- Fruity Flair: Incorporate fresh strawberries or raspberries to cut through sweetness and add freshness.
- Nutty Crunch: Sprinkle toasted nuts or peanut butter swirls for extra texture and flavor.
- Vegan Option: Use dairy-free cream cheese and coconut whipped topping for a plant-based version.
- Mini Portion Cups: Serve the dessert in individual cups for portion control and easy sharing.

How to Make Oreo Delight A Dreamy No-Bake Dessert
Step 1: Prepare Your Oreo Base
Start by crushing Oreo cookies into coarse crumbs to maintain bite-sized crunchy bits. Press half of these crumbs firmly into the bottom of your serving dish to create the foundation.
Step 2: Mix the Creamy Filling
In a large bowl, blend softened cream cheese, whipped topping, sweetened condensed milk, and vanilla extract until smooth and luscious. This creamy mixture is what makes the dessert so dreamy.
Step 3: Layer It Up
Spread half of the creamy mixture evenly over the Oreo base, then add a layer of remaining crushed Oreos. Finish by spreading the rest of the creamy filling smoothly on top.
Step 4: Chill and Set
Cover the dish and refrigerate for at least 4 hours or overnight. This chilling step allows flavors to meld and layers to firm up, making slicing easier and flavors richer.
Step 5: Garnish and Serve
Before serving, decorate with additional crushed Oreos, chocolate shavings, or fresh berries for that extra wow factor and inviting look.
Pro Tips for Making Oreo Delight A Dreamy No-Bake Dessert
- Avoid Overmixing: Gently fold ingredients to keep the texture light and fluffy.
- Use Room Temperature Cream Cheese: It blends more smoothly and prevents lumps in the filling.
- Chill Time Is Key: Longer chilling enhances flavor fusion and dessert stability.
- Press Crust Firmly: A compact Oreo base ensures each slice holds together well.
- Choose Quality Oreos: Original Oreos work best for classic flavor, but try different flavors for a twist.
How to Serve Oreo Delight A Dreamy No-Bake Dessert
Garnishes
Add finishing touches like crushed Oreos, drizzled chocolate, or a sprinkle of sea salt to elevate both appearance and taste. Fresh mint leaves or berries add a pop of color and freshness.
Side Dishes
This dessert pairs wonderfully with simple sides such as a scoop of vanilla ice cream or a light fruit salad to balance its richness, creating a perfectly rounded dessert experience.
Creative Ways to Present
Serve in a trifle dish or individual parfait glasses to show off the beautiful layers. You can also use clear jars for gifting or portable snacking at gatherings.
Make Ahead and Storage
Storing Leftovers
Keep leftover Oreo Delight A Dreamy No-Bake Dessert covered tightly in the refrigerator for up to 4 days to maintain freshness and texture.
Freezing
This dessert can be frozen in an airtight container for up to one month. Thaw in the refrigerator overnight before serving for best results.
Reheating
Since it’s a no-bake chilled dessert, reheating isn’t necessary. Serve cold to enjoy the ideal creamy and crunchy balance.
FAQs
Can I use different cookies instead of Oreos?
Absolutely! While Oreos give that signature chocolate crunch, you can experiment with chocolate chip cookies, graham crackers, or gluten-free alternatives based on your preference.
Is this dessert suitable for kids?
Yes, this dessert is very kid-friendly, with familiar tasty layers and easy-to-eat textures that children generally enjoy.
How long does it take to prepare?
The preparation itself is quick, around 15-20 minutes, but chilling time requires at least 4 hours or overnight for the best results.
Can I make this dessert dairy-free?
Yes, by substituting cream cheese and whipped topping with vegan alternatives, you can create a creamy, dairy-free version of this dessert.
What if I don’t have sweetened condensed milk?
You can substitute with a mixture of heavy cream and powdered sugar, but the texture and sweetness may vary slightly; sweetened condensed milk provides the best creamy consistency.
Final Thoughts
Oreo Delight A Dreamy No-Bake Dessert is a wonderfully simple yet show-stopping creation that satisfies sweet cravings with minimal fuss. Whether you’re an Oreo fanatic or just love quick, creamy desserts with texture and flavor, give this recipe a try. It’s sure to become a favorite, a perfect go-to for celebrations or just a cozy night in.
Related Posts
- How to Make Homemade Vanilla Ice Cream Easily
- Why Byron Bay Chocolate Chip Cookies Are Irresistible
- Why Best Peach Dump Cake Steals Hearts
Oreo Delight A Dreamy No-Bake Dessert
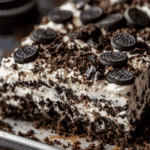
Oreo Delight A Dreamy No-Bake Dessert is a luscious, easy-to-make treat that combines the crunchy chocolate goodness of Oreos with creamy, smooth layers. Perfect for quick preparation without an oven, this dessert is ideal for busy days or last-minute guests, offering a rich flavor and stunning presentation while keeping your kitchen cool and stress-free.
- Prep Time: 15 minutes
- Cook Time: 0 minutes
- Total Time: 4 hours 15 minutes
- Yield: 8 servings 1x
- Category: Dessert
- Method: No-Bake
- Cuisine: American
- Diet: Vegetarian
Ingredients
Base
- 20 Oreo Cookies (crushed into coarse crumbs)
Creamy Filling
- 8 oz (225g) Cream Cheese (softened to room temperature)
- 1 cup Whipped Topping (such as Cool Whip)
- 1 cup Sweetened Condensed Milk
- 1 tsp Vanilla Extract
Instructions
- Prepare Your Oreo Base: Start by crushing Oreo cookies into coarse crumbs to maintain bite-sized crunchy bits. Press half of these crumbs firmly into the bottom of your serving dish to create the foundation.
- Mix the Creamy Filling: In a large bowl, blend softened cream cheese, whipped topping, sweetened condensed milk, and vanilla extract until smooth and luscious. This creamy mixture is what makes the dessert so dreamy.
- Layer It Up: Spread half of the creamy mixture evenly over the Oreo base, then add a layer of remaining crushed Oreos. Finish by spreading the rest of the creamy filling smoothly on top.
- Chill and Set: Cover the dish and refrigerate for at least 4 hours or overnight. This chilling step allows flavors to meld and layers to firm up, making slicing easier and flavors richer.
- Garnish and Serve: Before serving, decorate with additional crushed Oreos, chocolate shavings, or fresh berries for that extra wow factor and inviting look.
Notes
- Avoid Overmixing: Gently fold ingredients to keep the texture light and fluffy.
- Use Room Temperature Cream Cheese: It blends more smoothly and prevents lumps in the filling.
- Chill Time Is Key: Longer chilling enhances flavor fusion and dessert stability.
- Press Crust Firmly: A compact Oreo base ensures each slice holds together well.
- Choose Quality Oreos: Original Oreos work best for classic flavor, but try different flavors for a twist.
Nutrition
- Serving Size: 1 slice (1/8 of recipe)
- Calories: 350 kcal
- Sugar: 28 g
- Sodium: 210 mg
- Fat: 20 g
- Saturated Fat: 10 g
- Unsaturated Fat: 8 g
- Trans Fat: 0 g
- Carbohydrates: 35 g
- Fiber: 1 g
- Protein: 4 g
- Cholesterol: 40 mg
Keywords: Oreo dessert, no-bake dessert, easy dessert, creamy dessert, layered dessert, Oreo recipe